Everything you need to run your store on Roowaj.
A complete walkthrough of signing up, building your catalog, choosing, editing and publishing your store's template, and managing orders — plus how to share your store link on WhatsApp, Instagram, Telegram, and Messenger.
Getting started
From signing up to a store with its own link — here's what happens in the first few minutes on Roowaj.
Create your account
Sign up with your name, phone number and a password — no payment card needed. A 6-digit code arrives on WhatsApp to confirm your number.
Set up your store
Type your store's name, pick its link (English letters, numbers and hyphens), your kind of business, your country and currency, and your governorate if you like. The name, link, kind of business and currency can be changed later in Settings.
Your store opens on «Classic»
Every new store starts on the Classic template: a clean, neutral design for any business, with a home page of a banner, your products and a contact block. Your store works straight away, and you can change its template whenever you like from Storefront → Templates.
Get your store link
Your store's link is your-store-name.roowaj.com. Copy it from Storefront and share it everywhere — it's the only link you need.
Know your way around
Roowaj has two working surfaces: your dashboard, where you manage everything and which only you can see, and your storefront, the public store your customers browse at your link. You'll live in the dashboard day to day.
Building your product catalog
Your catalog is the foundation of your storefront — here's what you can add to it.
Product types
Add physical products (inventory-tracked goods), digital products (delivered via a download link), bookings (appointments with duration, buffer time, and availability), subscriptions (recurring billing), or anything else under "Other."
Pricing & images
Every product gets a name, description, price, and photos — add a "compare at" price to show a discount, and per-unit pricing if you sell by weight or volume.
Variants
Selling sizes, colors, or flavors? Build variants from up to three option groups, like Size × Color, each with its own price, stock, and image.
Custom options & add-ons
Ask customers questions at checkout — engraving text, a date picker, extra toppings — each option can add to the price and be marked required.
Categories
Group products into categories so customers can browse and filter your storefront by type.
Inventory
Turn on stock tracking per product or variant, and set a low-stock threshold so you get warned before you run out.
Templates: choose how your store looks
A template is your store's whole design: the header, the banner, the product cards, the home page's blocks, the footer — and in some templates the product page and cart too. Roowaj has a range of free templates, each designed for a different kind of shop, and all of them work on phones and computers. See each one as a complete demo store before you choose.
Classic — for any business
Clean and orderly, and the template every new store starts on. A centred logo with a side menu (or the logo with its links), a banner whose pictures change on their own, and round categories. The most flexible template: two headers, four banners and five product cards to choose from, and any block.
See the demo store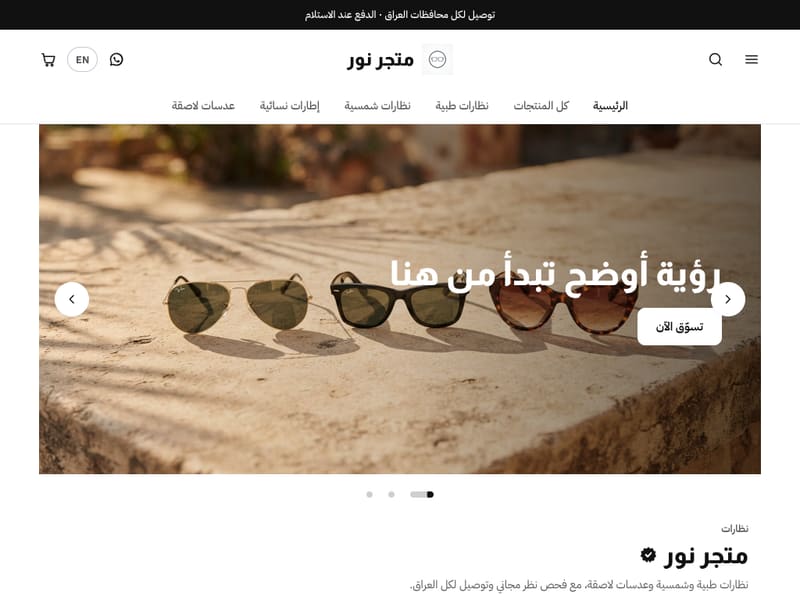
Souq — for a shop with plenty of everything
Search, categories and deals, like a big market. Search first in the header with categories as round photos under it, an offer banner in your colour, «Today's deals» with a countdown over the discounted products, then «All products». Every card has a «+» that adds to the cart straight away.
See the demo store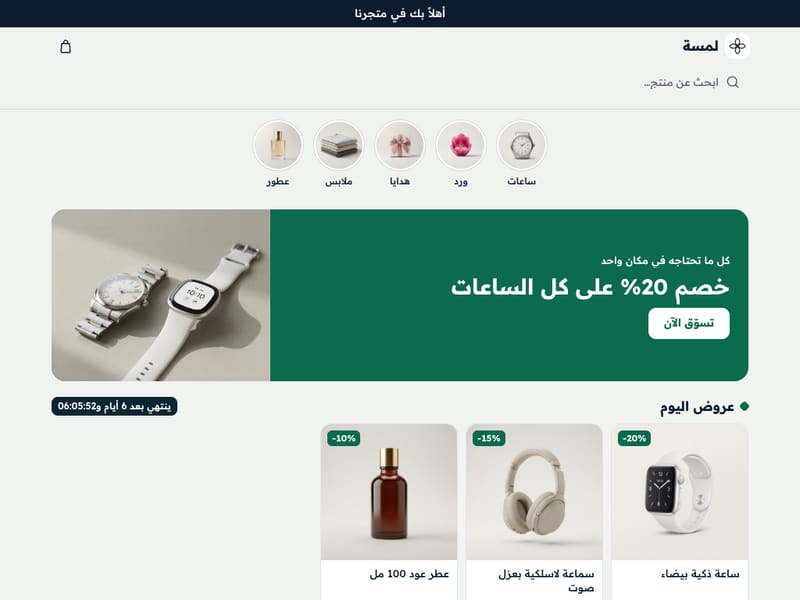
Fajr — for clothing and anything sold by its picture
A white page and big photos where the product is the hero. A full-width banner with its words on it, a product grid with a «Sale» pill, an image-with-text block for your story, three promises in columns, and categories as photo cards. The product page has two buttons: «Add to cart» and «Buy it now».
See the demo store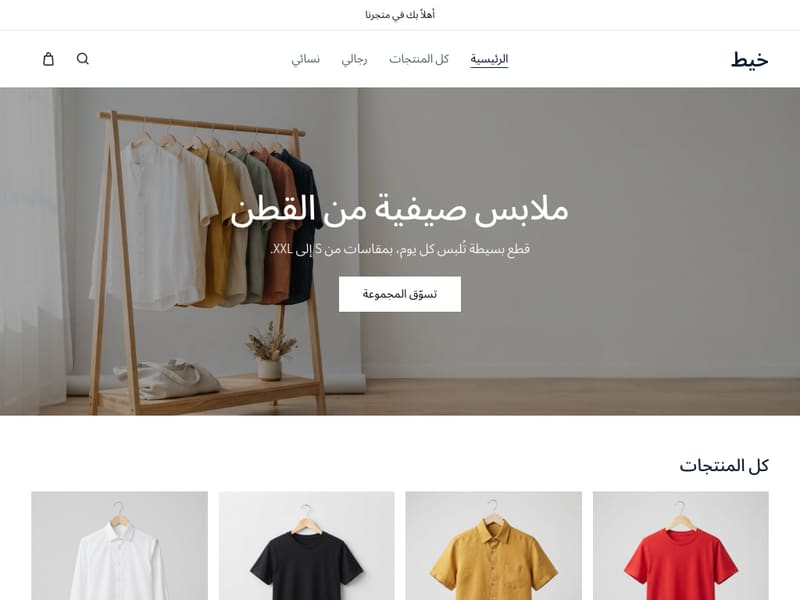
Nasaq — for any shop that wants a tidy page
Soft white cards on a light page, with a «Quick add» button on every one. Your categories as chips under the header and as round photos, and a countdown in a dark card. On a phone, a bar stays along the bottom: home, products, the bag and WhatsApp.
See the demo store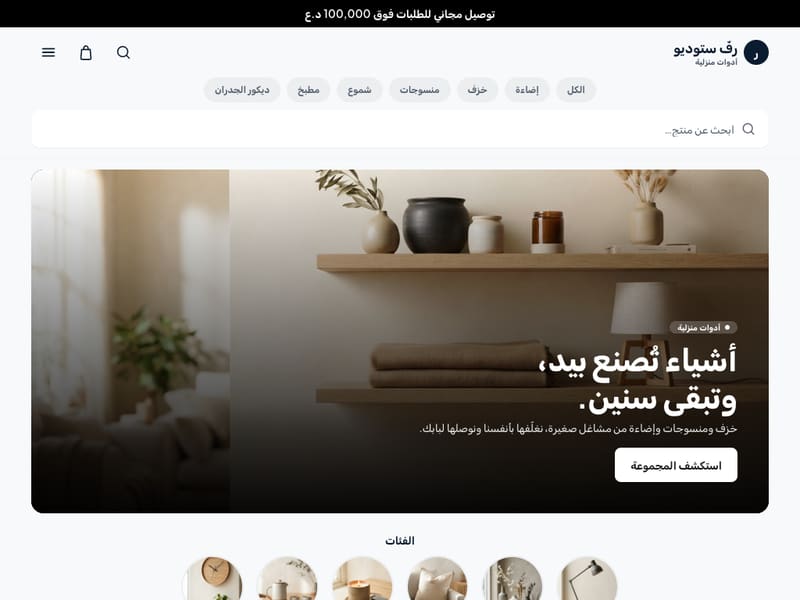
Atelier — for a fashion house or a few, dear pieces
Serif type, black on off-white, and big tall photos. One feature product across the page then cards in pairs, categories as tall photos, your story as a photo beside text, and a quote. On a phone, a bar along the bottom: discover, shop, WhatsApp and the bag.
See the demo store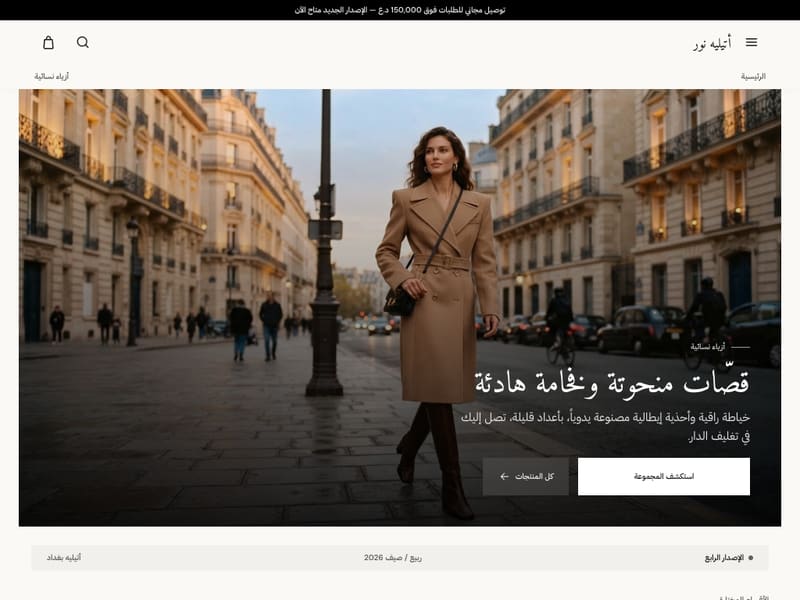
Volt — for device and electronics shops
A cool grey page, white cards and one blue. A wide search field in the header and an «All departments» button that opens every department, a wide banner with two department cards beside it, a bar carrying the warranty and payment on delivery, and a «Today's deal» band with a countdown above the discounted products. Device photos show whole, never cropped, and under the price it says how much the shopper saves. Write a product's description as «Spec: value» lines and the product page draws them as a table of specifications.
See the demo store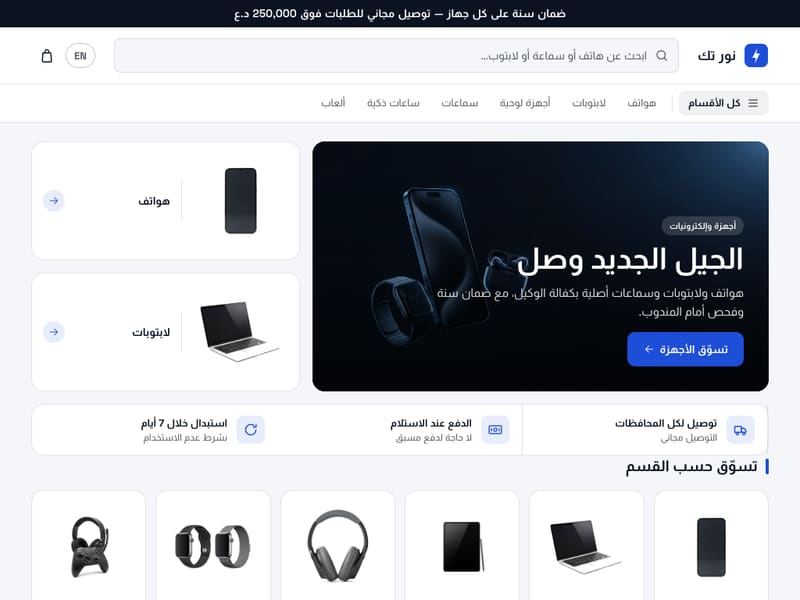
Every template is free. Each one has a «Theme guide» in the dashboard: the picture sizes it needs, where each picture shows, and what to write in each part — read it before you upload your photos.
Choosing and publishing a template
Try a new template and edit it as much as you like — your customers keep seeing your current store until you press Publish.
Open Templates
In the dashboard, go to Storefront, then Templates. At the top is the «Current theme» your customers see, then your «Theme library», then «Free themes».
See the demo store
Tap any free template's picture to open it as a complete demo store with products and photos, on your phone or computer. Browse it the way a customer would: the home page, categories, a product page and the cart.
Read the theme guide
Tap «Theme guide» under its name to see what it needs to look as designed: the logo size, the banner, product and category picture sizes, and how many products suit it.
Add it to your library
Tap «Add». The template joins your Theme library and your published store doesn't change. It brings its design, colours and home page blocks, and takes a copy of your logo, banner pictures, bio, announcement bar, popup and menu links, with its categories block filled from your categories — so you don't start from scratch.
Edit it
Tap «Edit theme» beside it to open it in the editor. Change the colours, pictures and blocks however you want. Every change saves automatically into that theme alone, and your customers don't see it.
Preview it
Tap «Preview» in the editor, or the arrow beside «Publish» in the library, to see your store on the new template with your real products, as customers will.
Publish it
When it's ready, tap «Publish» and confirm. The new template replaces the old one at once, on the same link, and the old one stays in your library exactly as it was — you can publish it again any time.
Changing template never touches your products, categories, orders or customers, or your store info and checkout settings. The checkout page is the same in every template, so customers order the same way whatever your store looks like.
Your theme library
Your library keeps every template you've added with all its settings, so you can go back to any design without rebuilding it.
The current theme
What your customers see now, with the date it was published and the template it's built on. Tap «Edit theme» to change it; your edits stay hidden from customers until you publish them, and it shows «Unpublished changes» until then.
Up to 10 themes
A store keeps ten themes, the published one included. Each has its name, its picture and when it was last edited. At ten, delete one to add another.
Each theme keeps its own settings
Every theme in your library owns everything about the look: logo, banner, colours, blocks, menu, announcement bar and popup. Editing one theme never changes another, and switching between them loses nothing.
Rename and duplicate
From the options button (⋯), rename any theme or duplicate it. Duplicating is handy for a seasonal version — for Ramadan or Eid, say — without touching your main design: publish it when the season starts and go back to the main one after.
Version
«Version» in the options tells you which version of the template your design is built on, and the latest version of it.
Delete
Delete any theme you no longer need from the options. The published theme can't be deleted — publish another one first.
The editor: make the template yours
One place for everything about how your store looks. It works on phones and computers, and you see your store as a customer does while you edit.
Opening the editor
From Storefront → Templates tap «Edit theme», or from Storefront → Pages tap «Edit» beside a page. The editor opens full screen.
On a computer
The settings list sits on one side and a live, phone-width preview of your store on the other. Click an item in the list to open its settings, or click a part of the preview to edit it directly.
On a phone
Your store fills the screen. Tap any part of it — the banner, the header, a block — and its settings open from the bottom, or tap «Edit» to see everything you can change.
Saving is automatic
Every change saves as a draft by itself, and its status shows at the top of the editor: «Saving…» then «Draft saved». Colours and shape change in the preview instantly; everything else once the draft is saved.
Colours
Pick a ready-made colour set in one tap, or set each colour yourself: primary for buttons and prices, background, cards, announcement bar, and text — which is picked black or white automatically unless you change it. «Restore template colours» brings back the template's own colours after any experiment.
Page layout
The header's arrangement, how the banner sits, and the product card style — from the choices your template offers.
Shape & spacing
Where your template offers them: corners (sharp, soft, round), buttons (rectangle or pill), product pictures (square or tall), headings (calm, balanced, bold), and the space between blocks (tight, comfortable, airy).
Logo & banner
Upload your logo and up to 10 banner pictures that rotate by themselves, write the banner's words, its button text and link, and a short bio for your store. Under «Banner images» you'll see the right size for your template.
Header
Choose which categories show in the header, and in what order. How they look follows the template: buttons under the name, round photos under search, chips, or links in the menu.
Blocks
Your home page is built from blocks, in order: product grid, categories, link banner, text, image, video, image with text, columns, countdown, marquee, map and contact. Add a block, change its order, duplicate it, hide it or remove it.
Product grid
Give the block a title, show all products or one category, set how many products, or turn on «Deals only» to show just the discounted ones. Pick the display: grid, list or horizontal rail — whichever your template offers.
«Not shown yet» blocks
Some blocks come with a template before you have anything to show in them, like categories or deals. They're marked «Not shown yet», and customers don't see them until they have something in them.
Menu
Add links that show after «Home» and «All products» in your store's navigation — your Instagram page, your story, or any link — and put them in the order you want.
Announcement bar
One line above the header for an offer, a delivery note or a holiday, with an optional link.
Popup
Shows to a new visitor once per session, on any page: a title, description, picture, a button with a link, and an optional countdown for an offer that ends.
Pages
Use «Page» at the top of the editor to switch between «Home» and «All products». The All products page takes its look from the template and its content from your products.
Publish and discard
«Publish» makes your changes live for customers at once. «Discard changes» takes the published theme back to what customers see now. On a theme that isn't published, the button reads «Publish this theme».
Each template shows only its own options. If your template doesn't have a setting you saw in another one, that setting is part of the other template's design.
Store info & checkout
What stays the same whatever the template: how customers reach you and how they order. It's in Storefront → Store info & checkout, and saves straight to your live store.
WhatsApp number
Turns on a «Message on WhatsApp» button in your store, so customers can ask before they order.
Social links
Instagram, Facebook, Telegram and WhatsApp — shown in your store's footer and contact block.
Exchange window
How many days you accept exchanges, shown as a promise at the bottom of your store. Leave it empty if you don't have an exchange policy.
Delivery methods
Choose what you offer: delivery, pickup, or both. Delivery fees are set in Settings → Shipping and Delivery, and customers are asked for their address when they order.
Order form
Decide what customers are asked for: a phone number (required or optional), an email, whether the cart's items show on the order page, and whether they can add a tip.
Opening and closing the store
On the Storefront page you copy your store link and can close the store for maintenance: visitors see a «Closed for maintenance» page while you can still browse it.
Sharing your store link
Your one store link works everywhere — here's how to put it in front of customers on each app.
Add your WhatsApp number in Storefront → Store info & checkout to show a «Message on WhatsApp» button on your storefront, so customers can ask questions before they order. Orders themselves are placed and tracked on your storefront and dashboard, not inside WhatsApp.
Put your store link in your Instagram bio, and reply to DMs by sending customers straight to your catalog instead of typing out prices from memory.
Telegram
Share your link in a Telegram channel, group, or directly in chat — however customers reach your storefront, their order lands in the same dashboard as everything else.
Messenger
Same story on Facebook Messenger — share your link there too, and checkout works exactly the same way.
One link, everywhere
However a customer reaches you, they end up on the same storefront and check out the same way — you don't have to keep four different processes straight, and every order lands in the same dashboard.
How customers order
Here's the path a customer takes from your link to a placed order.
Browse the catalog
Customers open your store link and browse by category or search, seeing prices, photos, and availability exactly as you set them up.
Pick a product
On a product page they choose variants like size or color, answer any custom options, pick a booking slot if it's a booking product, and set a quantity.
Review their cart
Items sit in a cart drawer accessible from anywhere on the storefront, with quantity controls and a running subtotal.
Check out
They enter their name and contact info, choose delivery, pickup, or dine-in, add an address if needed, and place the order.
Order confirmed
Roowaj saves the order to your dashboard as a clean, itemized ticket, and the customer sees an order confirmation with everything they just ordered.
Track the order
Customers get a permanent order-status link they can check anytime to see if it's pending, confirmed, or completed.
Managing orders in your dashboard
This is where you'll spend most of your time — the operational core of Roowaj.
See what's new
Your dashboard home shows today's sales, today's orders, and a list of recent orders the moment you log in.
Work the order list
Filter and search orders by status or date, and use tabs like Pending, Confirmed, Completed, and Cancelled to focus on what needs attention.
Open an order
See the full breakdown — items, chosen variants and options, customer contact info, delivery details, subtotal, discount, tax, delivery fee, tip, and total — and update its status from there.
Add an order manually
Taking an order over the phone or in person? Create it directly in the dashboard by picking a customer, products, and a delivery method.
Print what you need
Generate an invoice, a shipping label, or an item list for any order, straight from a print preview screen.
Act on several at once
Select multiple orders to update their status or export them together, instead of opening each one individually.
Customers, discounts, bookings & subscriptions
The tools that keep repeat business, promotions, and recurring orders organized.
Customers
Every storefront checkout automatically creates or updates a customer record by phone number, with their order history, notes, and tags — or add one manually.
Discounts
Create percentage or fixed-amount discounts, redeemable codes, automatic discounts, bundle deals, "buy X get Y," or free delivery — with usage limits and start/end dates.
Bookings
If you sell appointments, a dedicated Bookings view shows what's coming up, separate from your regular order list.
Subscriptions
Recurring-billing products renew automatically on schedule, generating new orders each cycle — manage active, cancelled, and completed subscriptions in one place.
Payments & store settings
The last mile: getting paid and tuning your store's basics.
Payment tracking
Mark orders as paid as customers pay you directly — cash, bank transfer, or however you've arranged it — so your dashboard always reflects what's actually been collected.
Store settings
In Settings, set your store's name and link, kind of business, country and currency, tax rate, low-stock threshold and time zone. Delivery fees are in Settings → Shipping and Delivery.
Ready to put this into practice?
Start free — your first products can be live in minutes.
Start for free